


How to Polish Acrylic After CNC Machining
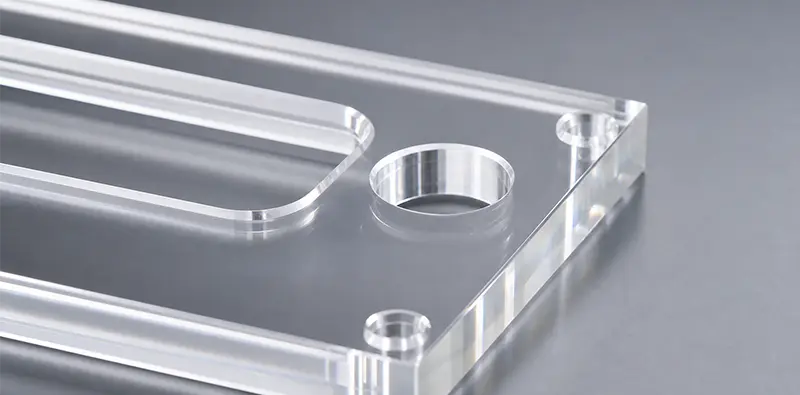
CNC machining can produce accurate acrylic parts, but tool marks, fine scratches and cloudy edges may remain, especially on clear PMMA. Acrylic polishing helps improve clarity and create a smooth finish while protecting critical dimensions, sharp edges and functional surfaces. At REKO, machining and polishing are planned together. This guide explains key polishing methods, step-by-step processes and how to improve appearance without creating new quality problems.
Table of Contents
- Why Does CNC-Machined Acrylic Need Polishing?
- What Is Acrylic Polishing?
- What Are the Main Acrylic Polishing Methods?
- How to Polish Acrylic After CNC Machining: Step-by-Step
- Acrylic Polishing Methods Compared
- How to Choose the Right Acrylic Polishing Method
- Does Acrylic Polishing Affect Dimensions and Tolerances?
- Common Acrylic Polishing Problems and How to Avoid Them
- Acrylic Polishing FAQs
- Conclusion
Why Does CNC-Machined Acrylic Need Polishing?
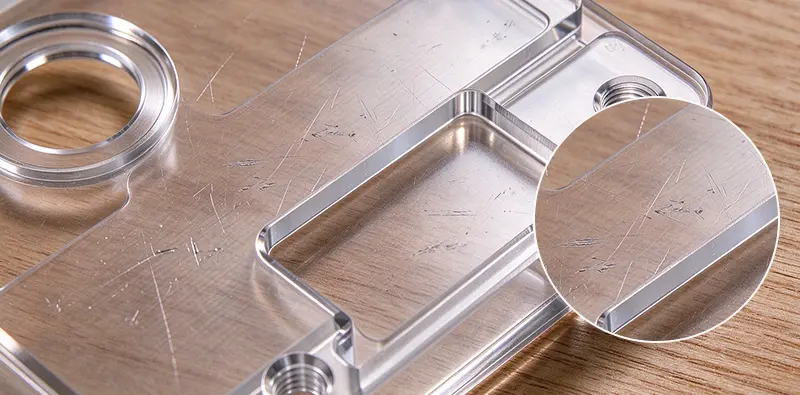
CNC machining gives acrylic accurate shapes and dimensions, but cutting tools can leave visible marks behind.
Common issues include:
· Cutter marks
· Fine scratches
· Cloudy or white edges
· Small chips
· Uneven gloss
· Rough machined surfaces
For transparent parts, these marks can be very noticeable. A clear acrylic cover may be dimensionally correct, for example, but rough white edges can still make the part look unfinished. The part can pass dimensional inspection and still fail the customer's visual requirements. Polishing helps remove or reduce these marks while improving clarity and surface gloss. However, not every surface needs polishing. Mounting faces, holes, sealing areas and other precision features may need to remain untouched. That is why polishing areas should be identified before finishing begins.
What Is Acrylic Polishing?
Acrylic polishing is a finishing process used to improve the smoothness, gloss and clarity of machined acrylic. Depending on the surface condition, polishing may involve sanding first and then using a polishing process to remove the finer marks. The objective is simple: Improve the visible surface without losing the geometry and accuracy created during CNC machining.
The method depends on:
· Surface condition
· Part geometry
· Required clarity
· Dimensional tolerance
· Production quantity
· Final application
There is no single polishing method that is right for every acrylic part.
What Are the Main Acrylic Polishing Methods?
Several methods can be used after CNC machining. REKO can select suitable polishing services according to the drawing, surface requirement and function of the part.
Mechanical Polishing
Mechanical polishing uses buffing wheels, polishing pads and polishing compounds to remove fine marks and improve gloss. It works well for many general CNC-machined acrylic surfaces and edges. The main advantage is flexibility. The operator can focus on selected cosmetic areas rather than polishing the complete part. However, excessive pressure creates heat and can soften acrylic or round sharp edges.
Hand Sanding and Buffing
When cutter marks or scratches are too deep for polishing compound alone, sanding is usually required first. For acrylic, wet sanding is generally preferred because the water helps reduce heat and keeps abrasive paper from becoming clogged. A typical progression for deeper scratches may begin around 240 or 320 grit, followed by 400 and then 600 grit, depending on the starting surface and required finish. The exact sequence should still be selected according to the condition of the part.
Hand sanding is especially useful for:
· Prototypes
· Small batches
· Local repair
· Areas where machine access is limited
Flame Polishing
Flame polishing briefly heats the acrylic surface so the outer layer flows and becomes clearer. It is fast and can produce a high-gloss finish on suitable edges. But there is a trade-off. Flame polishing introduces heat and can increase surface stress. Too much heat can cause distortion, fine cracks or crazing. For stress-sensitive parts, additional process control — and in some applications annealing — may need to be considered. It is therefore better suited to appropriate cosmetic edges than to every precision feature.
Diamond Polishing
Diamond polishing uses a sharp diamond cutting tool to remove a very thin layer from an acrylic edge. It can create a smooth, highly transparent finish while keeping straight edges more controlled than aggressive buffing.
This makes it useful for:
· Straight transparent edges
· High-quality display parts
· Precision clear components
· Parts where edge geometry matters
What About Solvent or Vapour Polishing?
Solvent or vapour polishing can improve acrylic clarity, but it should not be treated as a normal polishing method for every CNC part. It requires careful chemical handling and can create additional safety and material risks. For most precision CNC acrylic parts, controlled mechanical, diamond or suitable flame polishing is generally easier to manage.
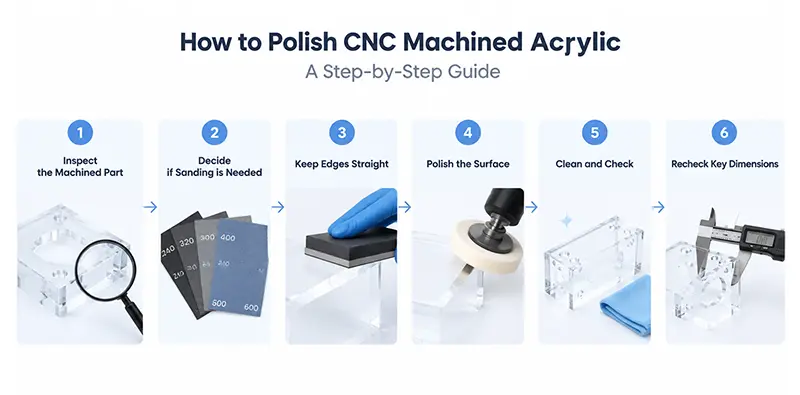
How to Polish Acrylic After CNC Machining: Step-by-Step
A good polishing result starts before the polishing wheel touches the part.
Step 1: Inspect the Machined Part
First check the surface under good lighting.
Look for:
· Cutter marks
· Scratches
· Cloudy edges
· Chips
· Sharp corners
· Tight-tolerance areas
Mark which areas need cosmetic improvement and which areas must remain dimensionally controlled. Do not automatically polish every surface.
Step 2: Decide Whether Sanding Is Needed
Light machining marks may sometimes be removed through polishing alone. Deeper scratches and cutter marks normally need sanding first. Wet sanding is useful because it reduces frictional heat and helps the abrasive cut more evenly.
For deeper scratches, a common starting sequence is:
240/320 grit → 400 grit → 600 grit
Each stage should remove the scratches left by the previous stage. Do not jump directly from a coarse abrasive to final buffing.
Step 3: Keep the Edge Flat
When sanding straight edges by hand, use a flat sanding block where possible.
This helps avoid:
· Rounded edges
· Uneven surfaces
· Local low spots
· Changes in geometry
Use light, controlled pressure rather than trying to remove material as quickly as possible.
Step 4: Polish the Surface or Edge
Once the deeper marks have been removed, move to the selected polishing method.
This may be:
· Hand buffing
· Mechanical polishing
· Diamond polishing
· Flame polishing for suitable edges
· Keep pressure, contact time and heat under control.
More pressure does not always mean a better finish. Too much pressure can generate heat and damage the acrylic.
Step 5: Clean and Inspect
After polishing, clean the part carefully and inspect:
· Clarity
· Gloss
· Remaining scratches
· Edge condition
· Surface consistency
Transparent parts should be checked under suitable lighting because small scratches can be difficult to see under poor light.
Step 6: Recheck Critical Dimensions
Polishing removes material. For cosmetic surfaces this may be very small, but critical features should still be checked when required. For example, if an acrylic housing has polished outer edges but precise mounting holes, the visible areas can be polished while the holes and mating faces remain protected. A good finish should improve appearance without creating an assembly problem.
Acrylic Polishing Methods Compared
The table below gives a quick comparison.
| Method | Clarity | Dimensional Control | Speed | Best For | Main Limitation |
|---|---|---|---|---|---|
| Hand sanding & buffing | Good | Good | Slow | Prototypes, small batches, local areas | Labour intensive |
| Mechanical polishing | Very good | Good | Medium | General CNC acrylic parts | Heat and rounded edges if overdone |
| Flame polishing | Very good | Moderate | Fast | Simple cosmetic edges | Heat, stress and crazing risk |
| Diamond polishing | Excellent | Very good | Medium | Straight precision edges | Limited by geometry and equipment |
| Solvent/vapour polishing | High | Moderate | Varies | Special applications | Chemical and process risks |
For straight precision edges, diamond polishing can offer strong clarity and good geometry control. For general cosmetic surfaces, mechanical polishing is more flexible. Flame polishing is fast, but should not automatically be selected when heat, stress or tight tolerances are concerns. The best method is the one that meets the drawing and appearance requirement with the least unnecessary risk.
How to Choose the Right Acrylic Polishing Method
Before choosing a polishing process, answer five questions.
What Finish Does the Part Need?
Does the customer need:
· A clear transparent edge?
· High gloss?
· Light tool-mark removal?
· Optical appearance?
· A simple cosmetic improvement?
The finish requirement should come before the polishing method.
What Is the Part Geometry?
Straight edges are easier to polish than deep pockets, small internal features and thin walls.
Complex geometry may limit access or increase the risk of heat and deformation.
Which Surfaces Are Functional?
Identify:
· Mating faces
· Mounting features
· Sealing surfaces
· Small holes
· Sharp edges
These areas may need protection from unnecessary polishing.
Will the Part Be Bonded Later?
This point is easy to miss.
Do not automatically polish an edge that will later be solvent bonded.
Polishing can round the edge and reduce joint quality. Flame-polished edges can also be more sensitive to crazing when exposed to solvent cement. Bonding requirements should therefore be reviewed before the finishing process is selected.
Is It a Prototype or Production Part?
Hand polishing may work well for one prototype. For repeated production, consistency becomes more important.
The process needs to control:
· Sanding sequence
· Polishing time
· Pressure
· Polishing area
· Inspection standard
A good production process should give similar results from the first approved part to the final part.
Does Acrylic Polishing Affect Dimensions and Tolerances?
Yes.
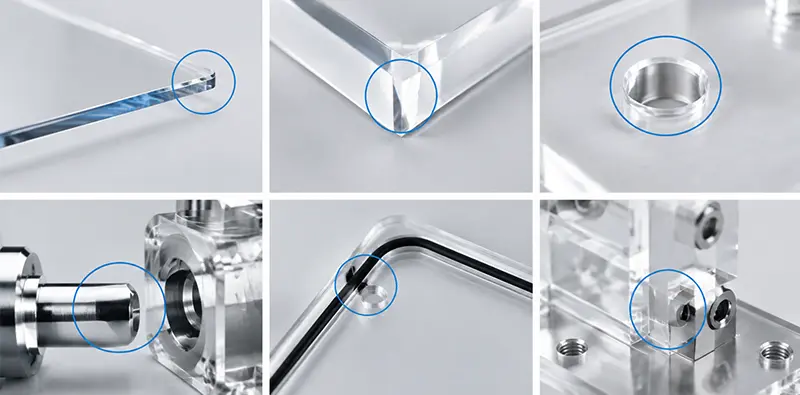
Most polishing methods remove some material, and heat-based methods can also change the local shape if they are not controlled.
The main risk areas are:
· Thin edges
· Sharp corners
· Small holes
· Mating faces
· Sealing surfaces
· Precision mounting features
· Heavy buffing can round an edge.
· Sanding can reduce local thickness.
Too much heat during flame polishing can soften or distort an area. The tighter the tolerance, the more carefully polishing needs to be planned.
Should Polishing Allowance Be Added?
For some parts, yes.
If a surface needs significant sanding or finishing, machining allowance can sometimes be planned in advance. This is better than discovering after machining that polishing may take the final dimension outside the drawing requirement. At REKO, the machining plan, finishing area and inspection requirements can be reviewed together before production.
Critical dimensions can then be checked again after finishing where necessary.
Scratches Remain After Polishing
The earlier sanding steps were probably not sufficient. Final buffing cannot reliably hide deep scratches. Return to an appropriate abrasive and work through finer grades again.
The Surface Looks Cloudy
Cloudiness can come from:
· Poor sanding
· Excess heat
· Dirty abrasive
· Unsuitable polishing compound
· Uneven polishing
· Clean the surface between stages and avoid excessive heat.
Edges Become Rounded
Too much sanding or buffing pressure can change the edge shape. Use a flat sanding block for straight edges and keep polishing pressure controlled. For suitable straight edges, diamond polishing may provide better geometry control.
The Acrylic Overheats
Heat can soften acrylic and lead to:
· Surface melting
· Wavy edges
· Distortion
· Internal stress
· Fine cracks or crazing
· Keep the part moving during buffing and avoid heavy pressure.
Cracks Appear Later
CNC machining can leave internal stress in acrylic. Heat and some chemicals may make these stresses more visible. This is especially important when flame polishing or solvent bonding is involved.
Batch Parts Do Not Look the Same
For production work, appearance must be repeatable. A defined sanding sequence, controlled polishing area and clear inspection standard can reduce differences between parts. The goal is not to make one part look excellent. The goal is to make every approved part meet the same requirement.
Common Acrylic Polishing Problems and How to Avoid Them
Scratches Remain After Polishing
The earlier sanding steps were probably not sufficient. Final buffing cannot reliably hide deep scratches. Return to an appropriate abrasive and work through finer grades again.
The Surface Looks Cloudy
Cloudiness can come from:
· Poor sanding
· Excess heat
· Dirty abrasive
· Unsuitable polishing compound
· Uneven polishing
· Clean the surface between stages and avoid excessive heat.
Edges Become Rounded
Too much sanding or buffing pressure can change the edge shape. Use a flat sanding block for straight edges and keep polishing pressure controlled. For suitable straight edges, diamond polishing may provide better geometry control.
The Acrylic Overheats
Heat can soften acrylic and lead to:
· Surface melting
· Wavy edges
· Distortion
· Internal stress
· Fine cracks or crazing
· Keep the part moving during buffing and avoid heavy pressure.
Cracks Appear Later
CNC machining can leave internal stress in acrylic. Heat and some chemicals may make these stresses more visible. This is especially important when flame polishing or solvent bonding is involved.
Batch Parts Do Not Look the Same
For production work, appearance must be repeatable. A defined sanding sequence, controlled polishing area and clear inspection standard can reduce differences between parts. The goal is not to make one part look excellent. The goal is to make every approved part meet the same requirement.
Acrylic Polishing FAQs
Can CNC-Machined Acrylic Be Polished?
Yes. Tool marks, cloudy edges and many scratches can be reduced through sanding and polishing.
The right method depends on the geometry, tolerance and required clarity.
What Is the Best Way to Polish Acrylic?
There is no single best process.
Mechanical polishing is flexible, diamond polishing is strong for straight precision edges, and flame polishing can quickly improve suitable cosmetic edges.
Can Deep Scratches Be Polished Out?
Often yes, but deep scratches normally need sanding before polishing.
Removing a very deep scratch also removes more material, so local dimensions should be considered.
Can You Flame Polish CNC-Machined Acrylic?
Yes, for suitable parts.
However, the heat can introduce stress or distortion, so it is not the best choice for every thin-wall or tight-tolerance component.
Should Acrylic Be Polished Before Solvent Bonding?
Normally, an edge intended for solvent bonding should not simply be polished first.
A polished or rounded edge can weaken the joint, and flame-polished surfaces may be more sensitive to crazing when they contact solvent cement.
The bonding process should be considered before polishing.
Does Acrylic Polishing Affect Tolerances?
It can.
Sanding and polishing remove material, while heat-based finishing can affect geometry if poorly controlled.
Critical dimensions should be protected and checked where necessary.
Conclusion
Acrylic polishing can turn a rough or cloudy CNC-machined surface into a much cleaner and clearer finished part. But appearance is only half of the job. The right process must improve clarity while protecting the dimensions, edges and functional features that make the part work. That means choosing the polishing method from the drawing, geometry, tolerance, final appearance and any later assembly or bonding requirements. At REKO, CNC machining, finishing and inspection can be considered together before production begins. If you have a clear acrylic part with tool marks, cloudy edges or specific cosmetic requirements, send us your CAD file or drawing. We can review the machining, polishing and tolerance requirements together before production.